Kirchhoff's Loop Rule - Video Tutorials & Practice Problems
On a tight schedule?
Get a 10 bullets summary of the topic
1
concept
Intro to Kirchhoff's Loop Rule
Video duration:
11m
Play a video:
Hey, guys. So now we're going to start talking about Kirk AUVs loop rule, which is gonna be massively important when you start solving more complicated circuits. Now, we're gonna build this up a little bit of time over a few videos, and I'm gonna take a little bit slow, because I want you to have a strong foundation so that when you get to problem solving, it can be agrees. This can be a little Harry, so we're gonna build it up a little bit of the time. Let's check it out. All right, So, so far we've dealt Onley with resist what circuits that had a single source, like a single battery. Okay, but now we're going to start to get into circuits with multiple batteries, so we're gonna need new tools. And what we mean by new tools is new rules and new equations. Okay, so the new rule we're gonna use is Kirchoff loop rule, and it states that the sum of all voltages in a loop is simply zero. Okay, it's conceptually very simple, but it's pretty tricky to write equations. So once One way to summarize this entire thing here is just to say that the sum of all voltages in a loop is zero. This ruins also called Kirk AUVs or Kirk Shop's voltage law. Okay, voltage law. So loop rule because you're gonna be going in a loop, adding voltages or voltage law because you're adding voltages. Whatever you wanna call it, I want to point out that this rule actually works for any circuit. So we could have used this to solve some circuits earlier, but it's gonna be especially useful when you have multiple sources. It's too hard for the easy stuff, but it's necessary for the hard stuff. Got it. So let's see. So what we're gonna do is for each loop in a circuit, we're going to write one loop equation. So, for example, if you look here, these wires and all these elements form one loop, so we're gonna get one loop equation. So we're gonna focus on now is how to write this loop equation. Okay. What the equations will do is that we either add or subtract voltages off the batteries and the resisters. Okay, deed. We have a voltage of the battery here. Now the voltage of the resistor is simply I times are high times. Our eyes, the current and our is the resistance. And this comes from OEMs Law V equals IR. Okay, so that's the voltage of the resistor is gonna be. I are. So, for example, I have a current I hear. So it's going everywhere here. Okay? And what we're gonna do is we're gonna right the sum of all voltages, which, by the way, is going to equal zero. I'm going to write all the voltages here. I'm gonna list all the voltages. Okay, so I'm gonna pick a point here. Let's say we're gonna start here, and we're gonna make a loop all the way around. Um, this circuit here and I can go in any direction I can I can go this way or I can go the other way. I'm gonna go this way because it's the way that the currents going. So we're just gonna go with the currents. And so the first element that you run through here is our one. So what you're gonna do is gonna write. I are one. And then when you get to be too, you're going to just write plus V two and then you're gonna keep going here? Imagine you're moving along. You're going across this are too. So you're gonna write. Plus the current, which is I everywhere I are, too. And then you're gonna get over here, and you're gonna write plus V one. Now notice here that I said that the the equation is going to add or subtract voltages. And here I just added all of them, which is actually wrong. These voltages, they're going to be either adding or subtracting. And I don't know yet, we don't know yet which one. Okay, and that's what we're gonna talk about next. But I just want to give you a basic idea first, before we start that you're going to be adding these things and then setting them equal to zero. Now, are they going to be, um, adding or subtracting is what we're gonna talk about now, Okay, they're going to be added or subtracted, depending on two things on the direction of the current and on the direction of the loop. Okay, So direction of the current in this case was, um, was clockwise in the direction of the loop was also clockwise cool. Just to show you what I mean, by direction of current and direction of loop. So the first thing we're gonna do and we have to do this before we start writing the equation is we're going to use the direction of currents to put positive and negative signs on the ends of each resistor. Okay, so let me show you what I mean. Um, so here for a resistor, the positive sign, the positive end is where the current where the currents enters the resistor. So look at this diagram down here, the currents going this way, it enters the resistor here. So I'm gonna put a little positive on this side of the resistor, and therefore the negative goes on the other side. The current keeps going keeps going, and the current enters this resistor right here. So we put a positive here, make this negative, bigger and a negative here. Okay, so that's that first step. Got it for batteries. The positive end is always going to be, um, the positive terminal. So it actually does not depend on the direction of the current. So the positive terminal is a longer one here, so I'm just gonna put a positive on this side, so the other sides are negative. And I'm gonna put a positive on this side and this other sides of negative. Okay, so the first thing we do is we put these signs everywhere. Now what we're going to do is we're going to choose the direction of the loop. Remember, I mentioned when we started going around the circuit up there that I could have gone clockwise or counterclockwise. We're gonna choose the direction, and I'm gonna choose to loop this way. I'm gonna write loop here. And all that means is the sequence in which you're going to add things, right? So we're gonna start here and we're going to go this way. So the first element I'm going to cross is our one. Then I'm gonna cross V two and so on so forth. And it says here when crossing elements in this direction this is the direction of the loop. You're going thio, Add the voltage if you crossed that elements going from negative to positive. Okay, Once you get this, it's gonna be super simple, But I wanna move slowly here, so let's just see here. Um, if you're if you're going from negative to positive So if you follow the current here, you're going from positive to negative. That's the opposite here. Right? So if you add when you're going from negative to positive, this means you will subtract, subtract if you're going from positive to negative. Okay, so this are one here. The voltage of that are one will be subtracted. So I'm gonna write the some of our voltages is negative. I are one. Okay, now, let's go to the next element. I'm gonna keep going here, and I'm going from positive to negative again. So when I cross this, this battery, I'm going from positive to negative. So I'm going to subtract that voltage there. Okay, the to now, let's keep going. Now, I'm gonna go again from positive to negative. So because I'm going into the negative, I'm going to subtract the voltage of our two. And remember, the voltage of every resistor is always I are. So this is gonna be I are too. And finally I get to this last element here, and I'm going to cross it. And when I cross it right, imagine you're sort of charges going through. I'm going from negative to positive. Finally going to a positive. So this voltage will be a positive voltage when I listed here V one and this entire thing has to be set to zero. Okay, if you wanna make this a little neater, I could move some things around, notice that everyone's negative except view one so I can move everything to the other side, and it's gonna look like this View one equals B two. Plus, I want our I'm sorry, man. I Yeah, I r one plus, I are too. So that's the loop equation for this loop. Okay, So what I want to do now is I want to write a loop equation for the same circuit above which I drove down here. But now we want to go in the opposite direction of the loop. Let's go in the opposite direction of the loop. So I'm going to put my little starting point here, But now we're going to go this way. And what this means is that your first going to encounter this guy and jump through it? Okay, Now, remember, the first thing you do is you put these signs everywhere. Thes pluses and minuses. The battery is the easiest one to do because the big one is always Plus, this is always minus always plus always minus the resistor. The plus goes where the plus goes where the current enters the resistor. This is one of the most important things to remember. Okay, where the current enters the resistor So the current hasn't changed direction. So it enters here so positive to negative and the current keeps going to hear and then it enters your positive to negative. Now we're ready to start going around the loop Some of our voltages in this loop we're gonna start here. So the first element you jump across is the view one, and it's going from positive to negative. So it's gonna be negative. View one and then you keep going. You jumped are two from negative to positive. So it's gonna be positive. Voltage of the R two voltage of a resistor is I R. So I r. Two and then we're gonna keep going here, and we're gonna jump from negative to positive. So it's gonna be positive voltage of that battery, which is V two. And lastly, we're gonna get here and jump from negative to positive and because I'm going into a positive. It's going to be positive. The voltage of of our one, which is I r one. Don't forget at the end to set this entire thing to zero, okay? And you end up with this. Now, if I want to clean this up a little bit, I can move. The only guy that's negative here is V one, so I could move you one to the other side, and I get that V one equals V tube. Actually, I'm gonna right. I'm gonna right if you want on the left. Okay, I'm gonna write view one of the left view one equals. Imagine that all these guys go to the other side, and then you get rid of all the negatives. So you get something like this after a little bit of moving around. And the reason I wanted to put it here is because I wanted to show you this is the final equation, that this equation is exactly identical to this equation. And the point here that you absolutely have to remember is the direction of the loop does not matter. Okay? The direction of the loop does not matter in that it's going to give you the same equation whether you go clockwise or counterclockwise, So just pick one. Okay, Cool. So this is a quick introduction of how you write these loop equations. We're gonna do a little bit more to build up the concept so that you are a beast at this. Let's keep going.
2
example
Direction of Current in Loop Equations
Video duration:
9m
Play a video:
Hey, guys. So in this video, we're going to keep talking about writing loop equations, except that I'm gonna add one complexity, which is the fact that you won't always know the direction of the current. Let's check it out. All right, so in the more complex circuits that were about to start seeing you are typically not going to know the direction of the currents. So what you're gonna have to do is you're going to have to assume the direction of the current. Okay, this is the word that you typically hear. But what this effectively means that you're guessing them. In other words, if you don't know if you have no way of knowing, you just pick one on. Did you solve the problem that way? Okay. And don't worry about picking the wrong one. It's going to be okay. I'll talk about that at the end. Okay, So before I talked about having their being these two steps, um, to write in these equations, but there's actually a new step here that you have to take before you could even get the steps one and two. And it is that you have to assume assume the direction of all currents unless it's given to you. Right. So if you don't know, you assume if you're given a direction, then you use that direction. Okay, so then you're going toe label positive and negative signs, and then you're going to cross elements in the chosen direction of the loop. First, let's talk about number one real quick, and we've done this before, but just as a refresher for every one of these elements, you wanna put pluses and minuses to the left and right or in the opposite ends of the elements. So plus or minus here plus remind us here, and we're gonna do this based on this rule here. So the battery is going to be positive on its longer terminal. So you put a little positive on the longer terminal, remember? I'm gonna positive here, which means you put a negative on the other side. So positive here. Negative on the other side. Okay. Same thing here, by the way. Positive. Here. Negative on this side. Positive. Here. Negative on this side. Okay, um, resistor is going to be positive where the current enters the resistor where the current enters the resistor. So this depends on the direction of the current. If you don't know the direction of the current, then you're going to use the assumed direction of the current. Okay, Alright, cool. So in this question here, before we get into number two, we're being asked to, um right loop equations. So we're gonna be following these steps over here to do that. Okay. And here it's asking to write a loop equation if the current is clockwise. So here current is clockwise means it goes this way. So the current is answering this resistor here, so I'm gonna put a positive, and then it's and then this one must be a negative. The current keeps going and it enters this resistor here. So this is the positive end, and this is the negative end. And then here we want the current to be counter clockwise, which means it is going this way and it's entering this resistor here. So that's positive. The other one's negative. And then it's entering this resistor here. So this is positive, and this is negative. Okay, So Step one is to label Thebe positive and negative signs. We got that done. And Step two is to cross elements in the chosen direction of loop. In other words, you're gonna go around the loop and then you're gonna sort of jump over each one of these elements. And as you do that, you're going to add the voltage if you're crossing from negative to positive and you're going to subtract the voltage if you're crossing from positive to negative. Okay, remember that. So now let's just do that. Let's pick. Let's pick a direction of the loop here. We're gonna loop this way for both of them, and we're gonna start right here. Okay? Right here and right here. That's my starting point. So if I'm going in this direction, remember, the direction of the loop is just the sequence in which you're going to sort of walk around this circuit. It's not the direction of the current necessarily. Okay, so it's just the sequence that you're going to add these things. So I'm gonna write that the sum of all voltages in this loop is a bunch of stuff equals zero. Okay. And what we have to do is write all these different things. They're gonna be four numbers here or four elements here, adding or subtracting. So the first one we get to use this to own resistor, and I'm going from positive to negative. I'm going from positive to negative. So I'm going to subtract that voltage. Remember, the voltage of a resistor comes from owns law V equals IR. So here I'm gonna right, we're going into the negative, So I'm gonna write Negative, I r. And the resistance here is to homes. So I could do this. I cannot plug anything for I because we're looking for the currents. Okay, we're looking for the currents through the whole thing. All right, Now we're gonna keep walking here. I'm gonna jump from a positive to a negative. Therefore, that voltage is also going to be subtracted. Negative four v. I'm gonna keep going, and we're gonna jump from a positive to a negative. This voltage is also going to be subtracted. Negative. Um, this is a resistor. So it's going to be I r. I is I and R is one. And then finally, I'm gonna get over here and jump over this guy from it's gonna go from negative to positive because I landed a positive. This is a positive 10 volts. Okay, Everything is equal to zero, and this is gonna allow us to solve. So have four votes in 10 volts or 10 volts, minus four votes. If I combine these two things is going to be six volts and then I have negative to actually know what Let's move these guys to the other side. So if you move negative one, I it's gonna be positive. One I and then this is too. I it's gonna become positive, too. I So this is obviously just three I, and at this point, I'm gonna be able to solve. For I I is just 6/3, which is two amps and we're done. That's it for part eight. Now, we're gonna do the same thing here for part B, right? That the sum of all voltages in this loop equals a bunch of stuff equals to zero, and then it's going to be it's gonna allow us to solve for I What I love free to do is positive video right now. Try to emulate the steps that I had in part a See if you can get something for part B. I'm gonna keep rolling here, but hopefully you gave this a shot. It's important that you're following, and then you're able to do this yourself. So we're going to start here and we chose to go in the same direction, so I'm actually going against currents. Now. I'm going to sort of walk around the circuit against the direction of current, which is totally okay, right? So I'm gonna go here. And I mean, the first thing I gotta jump over is this, and I'm jumping from a negative to a positive. So this is gonna be positive. Um, the voltage of that resistor and that the voltage of resistors ir So it's i times to This is a new problem, by the way. So I can't just use this to over this to as current, right? We gotta find the current in this one, and then we're gonna keep walking here and jump from a positive into a negative terminal. So this is gonna be negative four votes and we're gonna keep walking here and jump from a negative to a positive and because I'll end on a positive. This is gonna be positive Voltage of the resistor voltages of resistors R or is ir. So it's gonna I Times are, which is one. And finally we get over here and we're gonna jump from a negative to a positive and because I'm landing on a positive. This is positive. 10. Okay, this may even be already a little repetitive for some of you. Hopefully, which means you are getting it. That would be awesome. So here I can add up these eyes. I have one eye in two eyes. Um, it's a lot of ice, so this is gonna be three I and then 10 minus four is six plus plus six volts equals zero. So if I'm solving for I'm gonna move this six votes the other way. Three I equals six votes. Therefore, I am sorry. Negative six votes. Whoops. Almost messed up. And that means that I is negative. Two amps. Okay, negative. Two amps. Now notice that this here was a two amps positive, and this year was a two amps negative. Do you think that's a coincidence? It isn't. It's not a coincidence at all. Um, in fact, you should have expected that because these are exactly the same circuits that you would get the same current. This negative here. What's up with that guy. All that negative duck means he said you've chosen or the direction that was assumed for you. He didn't choose. He was chosen for you was wrong. So if you had chosen this direction, it just means that you chose the wrong direction. But the cool part is, the answer is still right. You just now know that it was actually the current was actually physically moving in the opposite direction. Okay, so the answer to what is the magnitude of the current? Well, the current is too amps. That's the magnitude of the current. But the direction of the currents we now know is opposite to what we were working with where we're going with the current being counterclockwise, and we know the direction of the current is actually clockwise. Okay, here, I got a positive, Which means the direction I was working with was actually correct direction. Cool. So you pick. You were either given a direction or you assume slash guest one. And if you and if you you know, if you pick the wrong one, it's okay. You're just gonna end up with a negative current at the end, the number will still be right, and you would just know. Oh, whoops. I guess. The wrong one. That's cool. Flip it. You don't have to resolve the problem again. You would just know that the direction of the current is opposite to the assumes one. Okay, I said that same thing a few times. Hopefully that sticks. Let's get going.
3
example
Solving Circuits with Multiple Sources
Video duration:
12m
Play a video:
Hey, guys. So in this data, we're gonna put together everything we know about Kirk AUVs rules to solve a full problem. Let's check it out. All right, So we're gonna combine Kurt Calls or Kirchoff Junction rule, which is a simpler one. It's just that the current in equals current out. We're gonna also use the loop rule, which is the more complicated one where we have to write the loop equations and we're gonna use them together to solve more complicated circus circuits with multiple resistors. Here are the three steps we're gonna follow now. We've used lots of these parts individually. Now we're just putting everything together. First step, we're gonna label directions. We're gonna first label junctions. Remember, Junction is a split on the wire. So this point here is a juncture. I'm gonna call that a And this point down here is a junction gonna call that points be okay. So label the junction easy. We're gonna label loops and remember that loops are arbitrary. This is just the sequence in which you're going to walk through the resist through the, uh, through these, uh, circuit and you can pick the direction. So here's a loop, and we're just gonna go this way. We're just gonna go this way. I'm gonna call this loop one, and we're gonna go this way. I'm gonna call this loop to okay, So this step is done. This step is done. Um, now we want to label the direction of currents. And remember, currents will be the assumed direction. You can try to figure out which one might make most sense, or you could just randomly guessing. So here, notice that this battery has the positive here. Which means current typically would flow out of here if this was a single battery. Um, circuit, but you can't really know that for sure. But either way, I'm gonna just use that to sort of dictate that. I'm gonna assume that the current is gonna go this way. I'm gonna call this current one. Now, notice that there are three branches here, right? This is a branch. This is a branch, and this is a branch. So because there are three branches, I'm gonna have three different currents. Okay, let me clean this up a little bit, so I'm gonna call that I won. Um, there's another battery here, and this is a positive terminal here, So you could think that. Okay, the currents probably going this way. So I'm going to draw it right here. I to this better branch has no batter's just a resistor. Remember, The Junction rule says that current n equals current out. So if I have two currents going into the A, the third current has to be coming out of the A so that we're at least consistent. We're guessing all these directions, but at least let's do it any somewhat consistent way. All right, so I three we're going to assume that it's going that way. So we got our directions of currents assumed once we know that we can label positive and negative on voltage sources and resistors. So the batteries will be positive on the long side. Positive, negative, positive and negative. But the resistor will be where the currents will enter. Okay, so let's look at every resistor. This resistor right here. The current is entering from this side. So this is the positive. This is the negative on then. This resist right here. If you sort of backtrack, I too you can see that I, too, goes like this and then it goes like this, right? So I choose entering right here. So this is the positive of the resistor, and this is the negative of the resistor. You wanna be very careful setting this up because you could set this up wrong. You're going to get the wrong answer. Cool. So don't screw this part up, all right? Eh? So we're done here. We put our little pluses and minuses everywhere. Now we're gonna rights and equations. First, we're gonna write Junction equations. We're gonna write one for each junction. I have two junctions, two junctions. Therefore, I'm gonna have to Equations we're gonna do is first because they're easier. And then later we're gonna write loop equations for each loop. I have two loops. Therefore, I'm going to have to equations. Okay, but let's focus on the junction first. So for Junction A, I'm simply going to write that currents in equals currents out. Now look at it right here. I one goes in and I two goes in. So in is I one plus I to and then out. Is I three coming out. Okay, so that's it for Junction. Be same thing. I'm gonna write in equals out. So look at be here. I three is going. Um let me make this green. I three is going here because it just keeps going through I three we had already drawn. I two is coming out of B, and if you backtrack, I want if you sort of go backwards here, right, I one is obviously gonna look like this and like this so that it's just flowing. Now, if you look at B, I three is going in and the other two guys were going out, So it's gonna be I three equals out, which is I one plus I to and we're done with that equation. You might notice that these two equations are actually identical. They're both saying I three equals the other two. It's the same. Which means you effectively don't really have to equations. You just have one equations. I'm gonna cross that out so we don't get confused. It doesn't mean it's wrong. It just means that it's excessive. We don't need both of them. Okay, cool. So we got one equation out. Now we're gonna write these two loop equations, so let's start with loop one. Over here. Loop one, and then we're gonna right, Is that the some of the voltages equals zero. Okay, equals a bunch of stuff, which then equals zero. And this is what we have to fill in. Now, Loop one. Is this guy right here? Okay, I'm gonna pick a starting point, like in the little corner here, Actually, start over here. So we hit that battery first. So we're going to start here and go in that red direction, which looks like this. Okay, so you're walking over here, and then you get this battery, you have to cross that you're crossing from negative to positive. So your landing on the positive So this is gonna be positive. Nine volts. And I'm just gonna write a nine, because everything here is a voltage survey things in votes. So positive nine. And then you keep walking, keep walking. No one here and then the loop is just this little square here. So we're actually gonna turn here, and then we're gonna jump over, cross over this guy. We're gonna go from positive to a negative. So this is going to be a negative voltage now. Voltage of a resistor is given by OEMs law. Voltage equals I r. Okay, so this is gonna be the current through this resistor, which is I three times the resistance, which is 15. Okay. And that's it. There's nothing else. You keep going around the loop, you're done. So you just get back to the original point. So now we're done. I'm gonna move I three that way. So I get nine equals I three times 15 or I three equals nine, divided by 15 which is a 150.6. And actually, just to save time, gonna save space. I'm gonna put it over here. 9/15 is 0. amps. Cool. So we got that first one down and this is I three. And in writing this equation, we already solved for one of the currents. And if you look at the problem, the problem is asking for the currents through each one of the three branches. One man down. So let's get the second one. We're gonna write loop to here, and hopefully we can get a current out of this as well. Some of our voltages equals a bunch of stuff which equals to zero. Let's look at Luke. Two were looping this way I'm going to start over here and we're gonna go like that. Okay? I don't want you to confuse that with the current. This is the loop direction. So the first element that we're gonna hit up while they were walking here is we're going to jump over this, this resistor, and we're going from a negative to a from a negative to a positive. So this is gonna be positive. I are the voltage of resistance. Are are the current here? Is I to and the resistance actually just plug in the resistance? It's I two times 10. Now, notice that we're walking were looping opposite to current. That's fine. Okay, forget about that. Just go to just look at the positive and negative. So we're jumping into a positive, so it's positive. And then here we get this guy here right away, and we're jumping from a positive to a negative. We're landing on the negative. So this is negative or minus five, Volz. Okay, because we're going for a positive to a negative and we keep going. We keep going, we keep going, Then we want to complete the loop. We wanna go all the way back to this point right here. So we have to We're gonna go this way because that's the loop we chose. And we're gonna go from negative to positive. We're gonna go from negative to positive. So this is gonna be positive. The voltage of of the resistor, both of your resisters. I r The eye here is I three. And the R is 15 by the way. We already know I three it is 30.6. Okay, so we're gonna be able to plug that in there. So 10 I to minus five plus 50.6 times 15 equals zero. This is simply nine. I'm gonna write 10. I two equals Gonna put the I in that. The nine to the other side. Negative. Nine. I'm gonna move the five to the other side. It becomes a positive. So this is gonna be negative. Four. Negative four. Okay, so this is gonna be a negative four. So I two is going to be negative. Four, um, divided running out of space there. Negative four divided by 10 which is negative. 100.4 amps. Of course. Alright, So that's that. I got the second currents. I got that. I too is negative for amps. Now, what does this negative mean? Okay, I got a positive here, which is cool, but what does that negative mean? Well, what that means is that the direction of eye to that we assumed is actually wrong. Okay, So assumed. Let's write this here Very important. Assumed incorrect direction off I to. So I two is actually the other way. And I'm going to write this over here actual I to is in this direction right here. Okay, now, that doesn't mean anything. Um, that that doesn't mean you stop doing the problem where you do it again or you flip the you flip the arrow and start over. Now, you just know that the direction was wrong, but the answer is still correct. Um, the magnitude of the current is 0.4. In fact, we're going to keep using the wrong number. Alright, as we keep going here, but but deep inside, you know that the current is the other way. Alright, Cool. Um so we wanna find we have I two. We have I three we wanna find. I won, but we ran out of loop equations. We already made two loops. Eso What we're gonna do now is we can actually use this equation right here. We can use this equation right here to find I won because we already have the other two. So I one plus I to equals I three. So I one is simply I three minus i to I three is six amps minus I two. I two is negative. Four. Notice that you plug as a negative. Even though you know that that means that it's in the other way. Just keep rolling with it. Okay? Negative. Minus. So I have two negatives here, so there's gonna be a positive point. Six plus four is one. So the current through I one is one amp. Okay, Now we're basically done. I mean, we are done. What I wanna do is real quick. Just show you something with these currents. So I one right here Now we know was one amp and I know that I to the actual direction of eye to is this way. And I know
4
concept
Combining Voltage Sources in Series
Video duration:
4m
Play a video:
Hey, guys. So this short video, we're gonna talk about how we can merge. Voltage is in a circuit to make that circuit simpler. Let's check it out. All right. So you can combine voltage sources if the sources are connected in Siris. This only works if they're connected in Siris. You could do this to simplify a circuit. So, for example, I have a 10 volt battery here in a five volt battery. Here they are in serious Because there's a direct path between all these four guys here. The white doesn't split so their own Siri's so I can combine these two. So instead of having to batteries, I could just have one. And generally what you do, you just add up. The voltage is something like view on plus V two. Now, if the voltage sources are in opposite directions there, voltages are actually not going to add. They're going to subtract, Okay. And we're gonna do these two quick examples, and I think this is gonna make a ton of sense. Totally obvious. So look at this battle here. The positive terminals. This way. So it's pushing current this way, right? Like current police leaving the charge is leaving the battery through this side. This battery is here. So the positive sign is here. Let's put positive and positive. So this guy is also pushing this side. So you might imagine think of this as forces. Almost right. This thing is pushing clockwise. And then this thing is also pushing clockwise. They're helping each other. They're both pushing this in direction so I can redraw this and just say that these to act as a single battery of voltage. 15. It doesn't matter that there's a resistor in between them. Got it. Similarly, by the way, if you remember, we can also merge these two resistors there in Siris. So they're also just going to add up. So an equivalent circuit here would be one with a 15 volts battery. I'm actually just gonna draw in this direction here. That 10 instead of gonna put a 15 volts here, and the resistance is will add two plus three is five. It would be this five owns, okay. And by the way, this example here is asking us to find the magnitude and the direction of the current because they're both currents are going the same direction three direction of the current will simply be Let's right here. Direction is going to be clockwise now, what about the magnitude of that current? The current goes this way. Well, to find a magnitude of a current in a circuit like this, you can just right V equals I R. So I is going to be V over r the voltages the current. The resistance is five. So it's just three amps. Very simple. Now, here it's a little bit different because this guy over here is pushing current. Or at least it's trying to push current this way. Something that be really cool. If you could pause this video and try to do in your own, I think a lot of you are gonna get this right, because it's very straightforward. Um, but I'm gonna keep going here, So this guy is pushing this way. This guy is pushing this way. The clashing Well, who do you think is pushing current harder, Right. So the 10 volts is putting more of a pressure or providing more influence for the current to move, so that one is going to win, which means that despite the fact that they're pushing against each other. The currents will overall move in this direction. Okay, so the five is actually fighting against the 10 volts in making it weaker. Therefore, we can just subtract. The two were going to say 10 minus five is just five, which means the effective the equivalent voltage here is going to be five in this direction. Five volts this way again going up against a five ohm resistor. The direction is still clockwise, but the current will be different. Currents is going to be V equals ir We're gonna solve for I and this is gonna be the over our. The voltage is a five. The R is a five. So the answer is one amp coat. That's it for this one. Super simple. Let's keep going.
5
example
Find Two Voltages (3 sources)
Video duration:
7m
Play a video:
Hey, guys. So let's check out this example. So here we have a circuit with three batteries and three resistors and we wanna find two of the voltages. One voltage is given to us and then were asked to find V one. V two were also given two of the three currents. There are three branches, one branch to branch, three branches. So they're gonna be three cards and two of them already given to us. Now, remember, the general steps to solve these problems are that first we're going toe label a lot of stuff and then to we're going to write as many equations as we need to find everything we're looking for. Okay, so what do we lately we're labeling. Junctions were labeling, loops were labeling currents. And we're also putting at the end pluses and minuses on the resistors and the batteries, which is the set up to be able to write these equations. Alright, So junctions are easy. It's just points where the wire split. So let's call this A and B. You might notice that this for a right here. If I keep extending it, it's gonna go this way for a and then this is gonna go this way for a a right and right away because of loop because of junction rule, you might already be able to see here that if I have a five coming in and a four coming in, there has to be a nine coming out this way because current and equals current out. So nine in means there's going to be nine out, and that's this current. So now I actually already know all three currents, which is good. Alright, so let's label our we got the junctions out of the way. We actually already calculated on the currents, which is gonna be helpful. What about loops? So the currents on this loop is going this way. Five amps, five amps, right? I got all the currents labels, so I like to loop. Remember the direction of Lupus? Arbitrary. But I like to write loops that follow the current just because everything is going the same way. It's just easier in the brain, right? So we're gonna do a loop this way, which, if you notice it will follow the five amps all the way around, and then it's actually gonna follow the nine teams as well, not necessary. It's just a little nicer, but don't sweat it too much. You could just make a loop in any direction. Okay? Same thing here. I'm gonna start this loop right here at point B, and I'm also gonna spend this way which will neatly go along the direction of four. And the nine doesn't have Thio. Um, I just like doing that. Okay, cool. So those are the loops, and the currents are actually already all labeled. So we got this, this and this, and I'm gonna put pluses and minuses everywhere. The plus on a battery will always be on the long stick right here. So plus plus minus minus. And the plus on the resistor will be where the current answer. So the current entering from this side, So that's a plus. So the other is a minus. This is a plus because of the my name's right here. This is a minus. And then this is a plus because of the four amps entering that way, and this is a minus. So we're done setting this up really important that you get you get this right so you can write the equation properly now Let's write equations. Remember, there are junction equations and there are loop equation. So the junction equations will help you figure out the currents and the loop equations will help you figure out anything. But typically, voltages or currents right will help you figure out either one of those. We already know all the currents so we don't have to write a junction equation at all. In fact, when we said that five and four give you a nine were essentially writing that in our heads. Okay, so let's just right loop equations. So there are two loops, so we can write two equations. So for loop One, I can write that the sum of all voltages equals a bunch of stuff which equals zero. And what we gotta do is fill in this bunch of stuff. Loop one. If you go around loop one. This way, there are four elements that you're gonna hit up right to resistors and two batteries. So you should expect that they're gonna be four terms in this thing here. So the first thing we're gonna do is we're gonna go through the 18 volts. So we're walking over here. Let's make this a different color. We're gonna make it green. We're walking here and then you're gonna jump from a positive to a negative. So remember, that means we're gonna add 18 volts over here. You're jumping from a negative from positive to a negative. Sorry. Negative to positive. So that's positive. 18 and then positive to negative. So that's going to be negative in the voltage of the resistor, Remember, the voltage of a resistor is given by owns law. The equals IR. So I'm gonna right, I'm gonna make too little spaces here. This is for my eye. This is for my are the eye here is five and the R is eight. Okay, I'm gonna make a little bit more space here, just in case. Now we're gonna keep walking down this path here. Mom turned over here. We're gonna jump from a negative to a positive and this is going to be positive. I don't know that voltage. That's what I'm looking for. Positive you want, and I'm gonna keep walking jump from positive to negative. So negative. This is a resistor. Negative. I r the current is nine and the resistance is four. So you get this cool so let's clean this up. 18 minus 40. Plus, the one minus 36 equals zero. If you notice good news, there's only 11 variable here. Only 11 unknown. So you can solve for this. And if you move some stuff around, I got it. Here. You're gonna get You're gonna get 58. The first voltage is gonna be 58 volts. Quote. We already got V one. Now we just gotta get V two, and we're also done with equation for the first loop. So now it's gonna write an equation for the second loop, and hopefully the V two will come out of there. So the sum of all voltages in the second loop is gonna be a bunch of stuff equals zero second loop is also gonna run into two batteries in two resistors. So we expect four things to show up in this equation and let's keep going. So we're gonna jump here. Whoops. We're on color. Were running around with green. I forgot to put a plus and a minus here, But, you know, the plus is the big one. Um, we're gonna jump from positive from negative to positive. So this is gonna be positive. V too, by the way, that's the very bottom looking for right there. Um, I'm gonna keep going here, jump from positive to negative. So it's gonna be negative. This is a resistor. So I'm gonna put negative I r. I s four or a six, and then you're gonna keep walking here. You're gonna get here. You're gonna jump from here to here from negative to positive. So it's gonna be positive V one Positive V one, by the way, if you want is 58 so we could plug that in a swell, and we're gonna keep walking, and then we're gonna cross over, and we're gonna get negative. I are where I is the nine and our is the four. Okay, so if we write this out, you get V Tu minus 24 plus 58 minus 36. And if you move everything around carefully, you get that V two is just too Volz. Okay, so that's it for this one. We got the one. We got V two along the way. We also got all the current, so we actually know everything we need to know about this resistor. Uh, about this circuit. Rather. Alright, that's it for this one. Let's get going
6
Problem
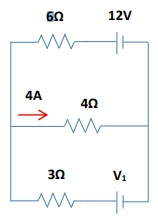
Problem
For the circuit below, calculate
(a) the voltage V1 shown, and
(b) the current through the 6-Ohm resistor.
A
i6Ω = 4.67 A, V1 = 1.8 V
B
i6Ω = 4.67 A, V1 = 24 V
C
i6Ω = 0.67 A, V1 = 26 V
D
i6Ω = 0.67 A, V1 = 30 V
7
Problem
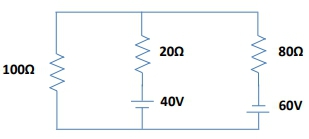
Problem
For the circuit below, calculate the voltage across the 100-Ohm resistor.
A
10 V
B
17 V
C
24 V
D
56 V
8
concept
How to Check Your Work (Kirchhoff's Rules)
Video duration:
6m
Play a video:
Hey, guys. So now that we've seen how to solve these complex circuits using Kirchoff rules, I want to show you a simple method. You can use the double check your work, and the idea here is that solving these circuits is a long process. There's a lot of steps to it. So there's a lot of room for small mistakes, and it be great to be able to quickly double check. So let's talk about that in this video. All right? So once you know everything, you know, all the voltages, all the currents, and all the resistance is you can double check your work with a simple rule. And you actually already know this rule, which is that all branches must have the same magnitude of voltage. Same magnitude of voltage. Okay, so you might remember we talked about this many times. If you have something like this and this voltage of the source is nine volts, then the voltage of this resistor is nine volts as well. And that's because there's sort of opposite to each other on the two branches. Right? You can think of these as, um, this is one branch and this is another branch. So the voltages have to be the same on opposite sides. Um, now, the direction must always be the same as well. And direction is actually not the right word. The right word here is polarity, but it really just means direction. So what does that mean? So if you have a nine volt battery this way and then a nine volt battery this way, it's the same voltage. But this one is positive on the left, and this one is positive on the rights. So they have different directions. The directions have to match and the total magnitudes have to match. So let's do this real quick. We're gonna hear, check if all the numbers match up now, just to be clear, you're not gonna get a test question that says, here's a complete circuit. Is this right or not? Right. I haven't seen those in tests, but I'm giving you this just to sort of build up the skill that might be useful if you have enough time at the end of a test, right? So or if you're doing your homework. All right. So we're gonna check that all the voltages on all the bridges Add up on a branch, remember? Is all of this But really you just have to worry about the top part because there's Onley. You only have circuit elements up here. There's nothing on the sides. Same thing here. So does that branch have the same voltage here as this branch and doesn't have the same voltage as this branch? So let's look at all the voltage. Is this guy is 18? What about this guy here? This is a resistor. The voltage of a resistor, remember? Comes from owns law the equals ir So I can just multiply the i with er Same thing here I can multiply the i against with er so I times are there gonna multiply? This is gonna give you the voltage are times I Okay, so let's multiply these numbers. This is a 40. Um, this here is a 36 volts volts, and this here is a 24 votes. Okay, so now we're gonna do is we're gonna put the polarities and I'm gonna actually I'm gonna write it over here. So this 18 has a positive and a negative, right? Remember, the positive and negative on the resistor depends on direction. of the current. And if the currents coming this way, this is a positive and the negative. So if you go here to the side, I'm gonna write that you have 18 V positive and negative. And then here you have 40 V positive and negative, and you can think of it as 18 volts this way and 40 votes this way. What do you think? Is that net voltage or the equivalent voltage of those two? If you have, if they're going opposite directions, they're going to subtract the 40. The 40 wins over the 18. So it's 40 minus 18 40 minus 18 which is 22. So this guy is the winner, which means this entire branch has the equipment voltage off a 22 with the positive pointing to the rights. Okay, Now all the other branches have to have the same thing. Let's look here. This is positive and negative. So I got a 58 Volz positive, negative. And this is a 36. The current look at these two currents here. Look at these two currents. The third one, they're both going into here, so the other one has to be this way which means this is a positive and this is a negative. So here I have positive 36 volts. Negative. The 58 this way is going to overpower to 36. And then you do 58 minus 36. That's 22 as well. Awesome. So I have a 22 to the right. Cool. So so far it's matching up. And then here at the end, I have a 24 here and a two here. The 24 wins. So it's 24 minus two. They're also go in opposite directions. It's 24 minus two. So you end up with 22 here and here. Okay, I drew it this way, but But I could also have drawn 22 this way. 22. This way. 22. This way. Maybe that's a little bit easier, Thio. Sort of for it to make sense, all these things have a polarity of 22 to the right. Okay? Or the positive sightings. Eyes on the right side, over here, off the whole branch. That's it. That's all you gotta do. So let's look at this one. And it might You're gonna be afraid to positive video and do exactly what I did before and double check it. This might seem a little longer, because the first time explaining But once you get the hang of it, you can do it really quickly. So I'm gonna keep rolling here, and I'm gonna go as fast as I can to show you that this can be actually pretty fast. So if you do in a calculator six times this to get the voltage, it's four volts. And if you multiply these two numbers to get the voltage, by the way, this is a period, not a comma. Hopefully caught that This is gonna be 14 volts. Okay, the this current is leaving. This current is leaving. So this current must be entering, which means this is positive. Negative, Positive, negative. Positive, negative. Positive, negative, Positive, Negative. By the way, if you solve this yourself, you already would have all these little negatives and positives everywhere. Cool. So what we have here? I have a four to the rights, and then I have a 12 to the right, and to the right means it's going negative to positive. Okay, so this is obviously a 16 to the right here. I have four times Four. That's 16. And it's to the right. Cool. And then here I have 14 to the right, and then I have 32. Um was saying to the right, I don't know. I don't remember, but this is to the left. I might have said to the right if I did. I'm sorry. Um, so obviously the 30 wins 30 minus 14 is 16. So 16 to the left. Okay, that's it. All you gotta do is edible. The whole to just make sure that it works. By the way, if you had a resistor here, you could have just moved it over here so that you're comparing sort of rose or just columns. Right? So it's a little bit easier to visualize, but a resistor here, for example, is part of this entire branch. So you could have just moved it over here to make it easier to sort of see, you're comparing just the rows of voltage goal. That's it for this one. Hopefully make sense. Hopefully helps. Let's get going
Do you want more practice?
We have more practice problems on Kirchhoff's Loop Rule