

11. Bonding & Molecular Structure
Lewis Dot Structures: Neutral Compounds
11. Bonding & Molecular Structure
Lewis Dot Structures: Neutral Compounds - Video Tutorials & Practice Problems

Get help from an AI Tutor
Ask a question to get started.
Lewis Dot Structures or Electron Dot Structures are diagrams that show how elements in a molecule use their valence electrons to form bonds.
Lewis Dot Structures
1
concept
Lewis Dot Structures: Neutral Compounds
Video duration:
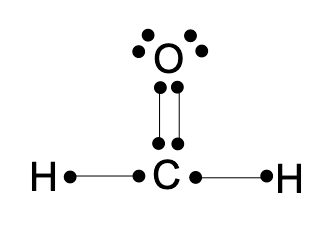
5mLewis Dot Structure of CH2O where H follows the duet rule.
2
Problem
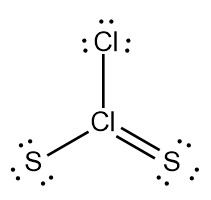
ProblemDetermine the Lewis Dot Structure for the disulfur dichloride molecule, S2Cl2.
A

B
C

D
3
example
Lewis Dot Structures: Neutral Compounds Example 1
Video duration:
40sLone pairs do not participate in bonding but contribute to the octet rule.
4
Problem
ProblemHow many lone pairs are on the central element for the following compound:AsH3.
A
0
B
1
C
2
D
3
5
Problem
ProblemHow many total bonding electrons are on the central element for the following compound:CO2.
A
8 bonding electrons
B
6 bonding electrons
C
5 bonding electrons
D
3 bonding electrons
6
Problem
ProblemHow many lone pairs are on the central element for the following compound:NOCl
A
0
B
1
C
2
D
3
7
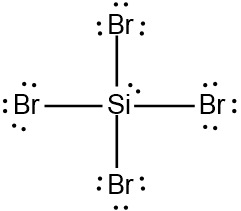
Problem
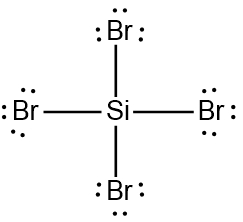
ProblemDetermine the Lewis Dot Structure for the silicon tetrabromide molecule, SiBr4.
A
B
C

D

8
Problem
ProblemDetermine the Lewis Dot Structure for the diazene molecule, N2H2.
Video duration:
1mWas this helpful?
Do you want more practice?
We have more practice problems on Lewis Dot Structures: Neutral Compounds
Additional resources for Lewis Dot Structures: Neutral Compounds
PRACTICE PROBLEMS AND ACTIVITIES (58)
- The partial Lewis structure that follows is for a hydrocarbon molecule. In the full Lewis structure, each carb...
- (b) How many nonbonding electrons surround the Xe in XeF2?
- How many nonbonding electron pairs are there in each of the following molecules: (b) CO
- How many nonbonding electron pairs are there in each of the following molecules: (a) N1CH323
- Using Lewis symbols and Lewis structures, make a sketch of the formation of NCl3 from N and Cl atoms, showing ...
- Using Lewis symbols and Lewis structures, diagram the formation of BF3 from B and F atoms, showing valence-she...
- (b) How many bonding electrons are in the structure?
- The following ball-and-stick molecular model is a representation of thalidomide, a drug that causes birth defe...
- Draw Lewis structures for the following: (d) CH2O (C the central atom)
- Write Lewis structures for the following: (a) H2CO (both H atoms are bonded to C), (b) H2O2, (c) C2F6 (contain...
- Write the Lewis structure for each molecule. a. PH3
- d. CH4
- (b) Draw the Lewis structures of two example THMs.
- Write the Lewis structure for each molecule. a. SF2
- Write the Lewis structure for each molecule. b. SiH4
- Write the Lewis structure for each molecule. d. CH3SH (C and S central)
- Write the Lewis structure for each molecule. a. CH2O b. C2Cl4 c. CH3NH2 d. CFCl3 (C central)
- Vinyl chloride, C2H3Cl, is a gas that is used to form the important polymer called polyvinyl chloride (PVC). I...
- Benzaldehyde, C7H6O, is a fragrant substance responsible for the aroma of almonds. Its Lewis structure is ...
- Benzaldehyde, C7H6O, is a fragrant substance responsible for the aroma of almonds. Its Lewis structure is (c)...
- Write the Lewis structure for each molecule or ion. d. C2H4
- Write the Lewis structure for each molecule or ion. a. H3COCH3
- In the vapor phase, BeCl2 exists as a discrete molecule. (a) Draw the Lewis structure of this molecule, using...
- Identify the third-row elements, X, that form the following ions. (a)
- Identify the fourth-row elements, X, that form the following compounds. (a)
- Write the Lewis structure for each molecule (octet rule not followed). b. NO2
- Ibuprofen 1C13H18O22, marketed under such brand names as Advil and Motrin, is a drug sold over the counter for...
- Write an appropriate Lewis structure for each compound. Make certain to distinguish between ionic and molecula...
- Amino acids are the building blocks of proteins. The simplest amino acid is glycine (H2NCH2COOH). Draw a Lewis...
- Formic acid is responsible for the sting of ant bites. By mass, formic acid is 26.10% C, 4.38% H, and 69.52% O...
- 1,2-dihydroxybenzene is obtained when two of the adjacent hydrogen atoms in benzene are replaced with an OH gr...
- Draw the Lewis structure for each organic compound from its condensed structural formula. e. CH3CHO
- Draw the Lewis structure for each organic compound from its condensed structural formula. c. CH3COCH3
- Draw the Lewis structure for each organic compound from its condensed structural formula. b. CH3OCH3
- Draw the Lewis structure for urea, H2NCONH2, one of the compounds responsible for the smell of urine. (The cen...
- Ammonia reacts with boron trifluoride to form a stable compound, as we saw in Section 8.7. (a) Draw the Lewis...
- A compound composed of only carbon and hydrogen is 7.743% hydrogen by mass. Propose a Lewis structure for the ...
- A compound composed of only carbon and chlorine is 85.5% chlorine by mass. Propose a Lewis structure for the c...
- The mechanism for the oxidation of HBr by O2 to form 2 H2O and Br2 is shown in Exercise 14.74. (c) Draw a plau...
- Methyl isocyanate, CH3NCO, was made infamous in 1984 when an accidental leakage of this compound from a stora...
- Gaseous iodine pentafluoride, IF5, can be prepared by the reaction of solid iodine and gaseous fluorine: I21...
- When 0.500 mol of N2O4 is placed in a 4.00-L reaction vessel and heated at 400 K, 79.3% of the N2O4 decom- pos...
- Complete these structures by adding electrons, in the form of dots, as needed.
- Choose a likely identity for x, y, and z in these structures.
- Which molecule has only one lone (non-bonding) pair in its lewis model?
- In a Lewis structure, _______. (select all that apply.)
- What is the maximum number of covalent bonds a carbon atom can form with other atoms?
- How many double bonds are in the lewis structure for carbon dioxide, CO2?
- How does adding a lone pair affect the position of existing atoms and lone pairs?
- Draw a Lewis structure for Cl2O2 based on the arrangement of atoms shown above.
- Which model best represents the Lewis dot structure for phosphorus trichloride (PCl3)?
- Determine the number of valence electrons in hcn and then draw the corresponding lewis structure.
- Which model best represents the Lewis dot structure for phosphorus trichloride (PCl3)?
- Draw a Lewis structure for Cl2O2 based on the arrangement of atoms shown above.
- Determine the number of valence electrons in BrF5 and then draw the corresponding lewis structure.
- What is the total number of outer (valence) electrons in sulfur dioxide, SO2?
- How many valence electrons must be accounted for in the Lewis structure of chloroethane (C2H5Cl)?
- The Lewis structure of N2H2 shows ________.